Converting your animation is rather a long winded process, but luckily enough it isn’t too difficult.
Because at the present you can only convert 3D studio 4.0 animation’s to the TOD format you must convert everything to 3D studio 4.0. So the first step is to export (explained earlier) your animation from 3D Studio Max. to a .3DS file which is the native format of 3D Studio 4.0. Then open this file in Studio 4.0 and press F4 followed by F12. Select TOD from the popup window.
Making sure the RST and OFF is selected click on save TOD to convert your animation to a TOD file. To create a compatible TMD you must now select save RSD. When asked if you would like the RSD files to be automatically named select yes.
After exiting 3D studio 4.0, at the DOS prompt change to the directory that the RSD files are in usually ‘c:\psx\rsd\2 and then type ‘edit 000.rsd’. You should now be in the DOS edit program with the file 000.rsd open. Delete all the comment lines, they start with a hash ‘#’, so that you are left with just a list of RSD file names. Save as model.arg and exit. Now at the prompt type ‘rsdlink -v -o model.tmd model.arg’. If the objects are textures you must have a copy of the TIM files in the same directory as the RSD files.
Summary of steps
1. From within 3D Studio Max. use the File pull down, select Export then choose .3DS.
2. Copy your 3DS file into the 3D Studio 4.0 scenes directory (usually C:\3ds4\scenes\ ).
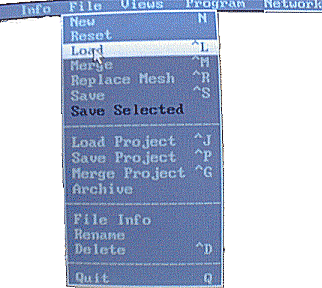
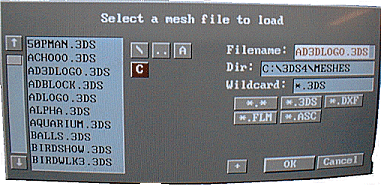
3. Open 3D Studio 4.0 and load your 3DS file. From the pull down menu at the top of the screen select file then load. Then you can select the file to load.
If your file is in a different directory to that shown in the box marker ‘Dir:’ Then You can click on this box and type in the directory of your file. Once you have your file selected click on the OK button.
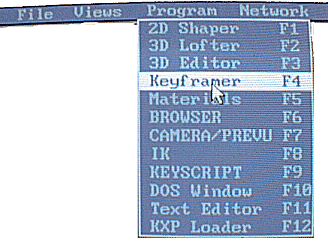
4. Press F4 to get to the Key Framer Screen. You can also get to the key Framer screen by selecting Program from the pulldown menu at the top of the screen followed by choosing keyFramer from the menu. [Note. you can preview your animation at this screen].
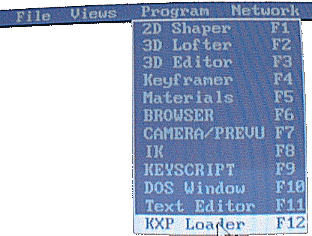
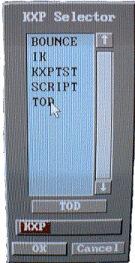
5. Press F12 to open the KXP plugin window and select TOD, then click OK. Again you can also open the plugin window by selecting the ‘KXP Loader’ form the ‘Program’ pull down menu. Selecting the KXP Loader.
You are then presented with the KXP Selector menu. Now you must select TOD and click the OK button.
6. You are then presented with the TOD conversion screen. the PlayStation TOD plug-in.
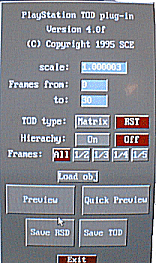
7. You must make sure that RST and OFF are selected and that the correct scale and frames range has been set.
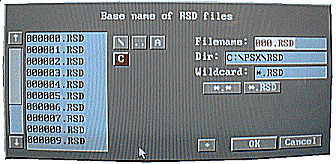
8. Now click on the ‘save RSD’ button. This saves each object in your animation as separate RSD files. Select OK when asked if you would like the files automatically named. Automatic file name generation prompt.

When you are presented with the RSD save file dialog box enter the relevant details. For the purpose of this tutorial leave the details to the default and just select the OK button. .
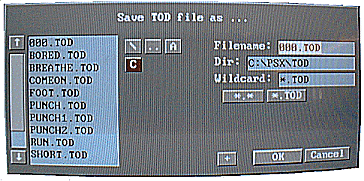
9. Next click on the ‘save TOD’ button. This saves your animation into a TOD file. This dialog is looks the same as the dialog in step 8. You may wish to change the name of the TOD file.
10. You must now exit 3D studio 4.0. Press ‘Q’ and reply to the resulting dialog with a yes.
11. In the directory ‘C:\PSX\RSD\’ edit the file ‘000.RSD’, this contains a list of all the RSD files in your animated model. Delete all the commented lines (lines that begin with ‘#’), to leave a list of the RSD file names. Save this file as model.arg.
12. At the DOS prompt type:- rsdlink -v -o model.tmd model.arg You now have your TMD file and your animated TOD file ready to include in your program.
|
|